
I love making pies—they’re my favorite dessert.
But pies can be a little intimidating—they need careful cutting, placing, and edging of the pie dough.
That’s why I’ve written this post. I want to show you that getting those pretty pie crust edges is actually quite easy!
All you need is a little patience and my helpful pie crust tips.
Keep reading to learn how to make 5 simple and beautiful pie edges. I’ll show you my tried and tested pie crimping techniques, plus some pie crust tips to keep everything looking amazing!

Transferring Pie Crust to a Pan
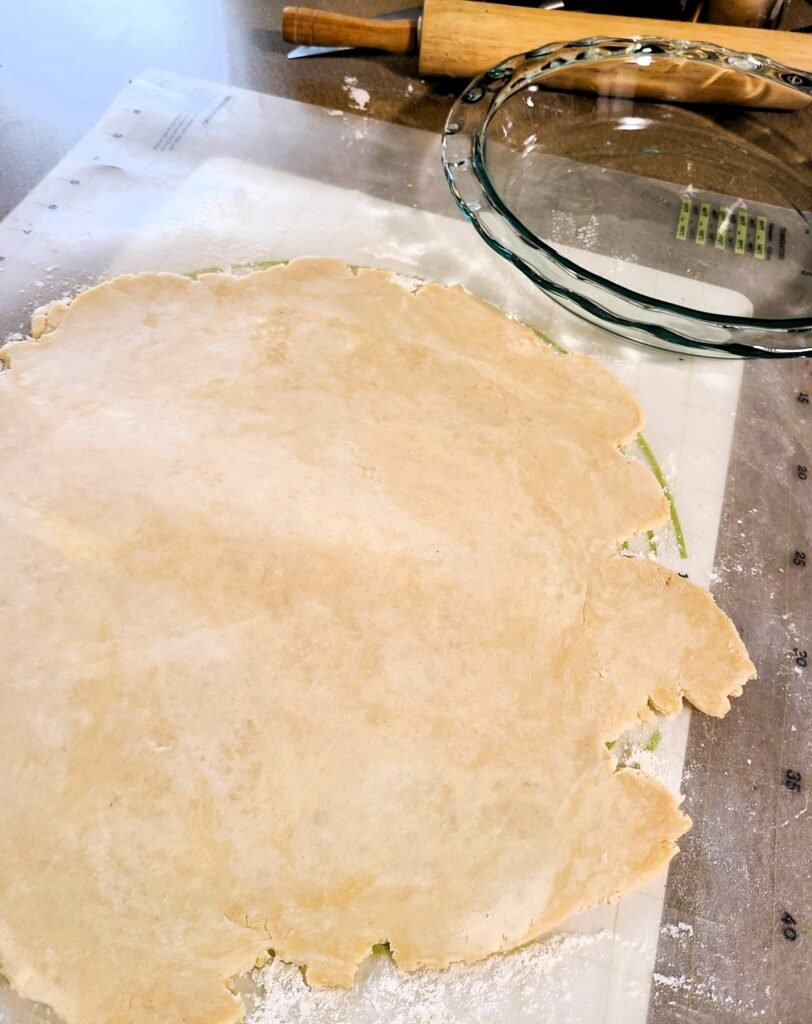
First thing’s first: you’ve got to get that pie dough into the pan without stretching or tearing it.
There are three main ways of doing it:
- Folding Method: Nice and gently, fold the dough into quarters. You can then place the corner in the center of the pie dish and carefully unfold it. This works great for smaller pies.
- Rolling Pin Method: Probably the most well-known method. This involves wrapping the dough loosely around a rolling pin. You then unroll it into the pie pan. This is the best method for really big pies.
- Hands Only Method: If your hands aren’t too hot or sticky, and the dough is just right, you can slip your hands underneath, palm down. This is the most precarious method, but when I get lazy, I do use it!
Every baker has a preferred method. I like the rolling pin method—I find it to be quick and simple. But, the folding method is the most precise.
Expert Tip: A little sprinkle of flour can ease the process if your pie dough is a bit sticky. Just remember to brush away any excess.
Once your dough is in the pan, ease it into place by pressing it gently against the sides. You want a snug fit without any stretching.
Fitting and Trimming a Pie Crust
The next step is trimming the dough. How much of an edge you need depends on whether it’s one-crust or two:
- For a single-crust pie (like a tart), the dough should extend about ¼ inch past the edge of the pan.
- For a double-crust pie, you’ll need a bit more dough to work with. Leave about ½ inch of dough extending past the edge. You’ll use this extra dough when placing your top crust.
Remember to use a sharp knife or kitchen scissors to trim away the excess dough. This gives a nice, clean finish.
Placing the Top Crust (If You Have One)
If you’re making a double-crusted pie, here’s how to get the top layer on perfectly:
- After adding your filling, brush the edge of the bottom crust with a bit of water. This helps the top crust stick.
- Carefully lay the top crust over the filling (using one of the methods above) and then tuck the extra dough underneath the bottom crust.
- To finish, press all around the edge making sure to totally seal the pie. This will keep your filling from leaking out during baking.
How to Make 5 Simple Pie Crimps
For single-crust pies and tarts, of course—you can always leave the edges plain. This gives a more rustic, homemade look. But I’m all about those decorative touches.
The Fork Crimp
The easiest pie edge to make is the fork crimp. This works for single-crusted or double-crusted pies.
Just trim the edge of the pie dough all around the pie so that it has less than an inch of overhang. Fold the pie edge underneath itself so the excess sits on the lip of the pie dish.
With the flat side of fork, press the tines into the crust to create a pattern. Continue all around the circumference of the pie.
Expert Tip: Before baking, refrigerate your pie for about an hour. This will help the crust set so it holds its shape.
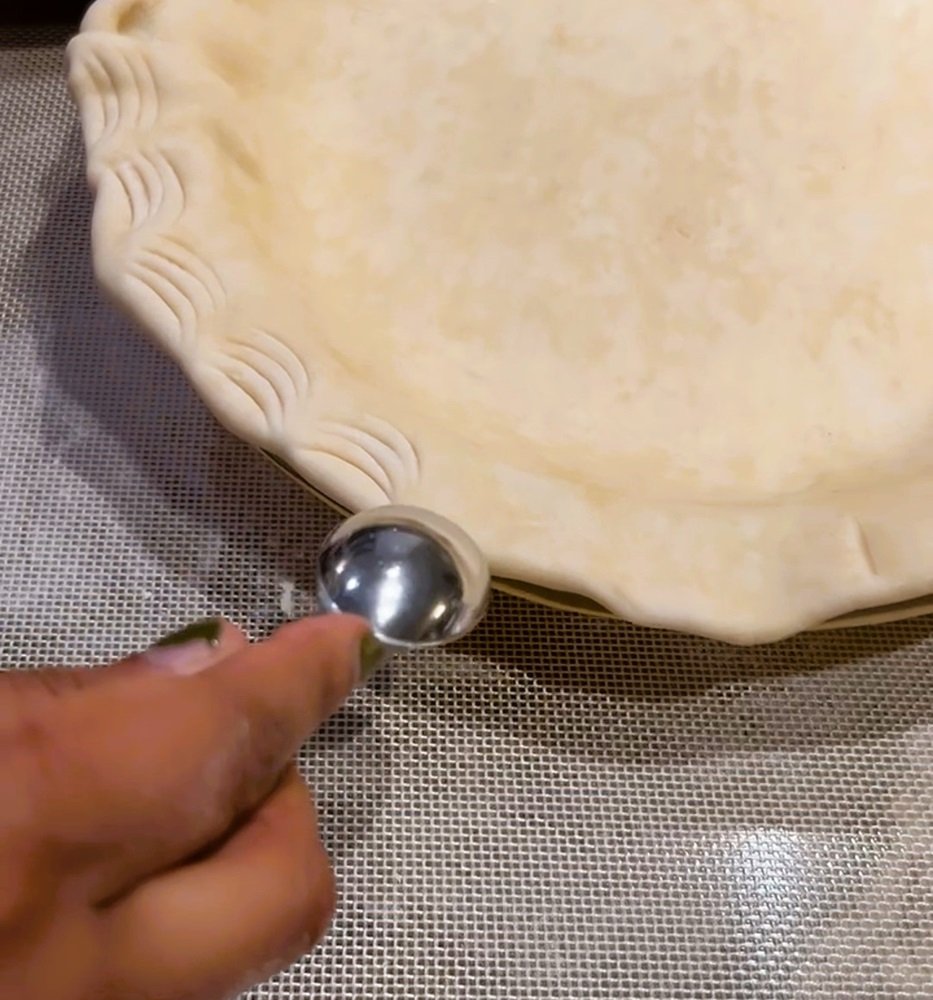
The Spoon Crimp
One step above the fork crimp, but still super easy! Press the tip of a spoon into the pie crust, creating 3 or 4 half moon shapes that radiate out towards the edges. Turn the dish and continue these impression all around the pie edge.

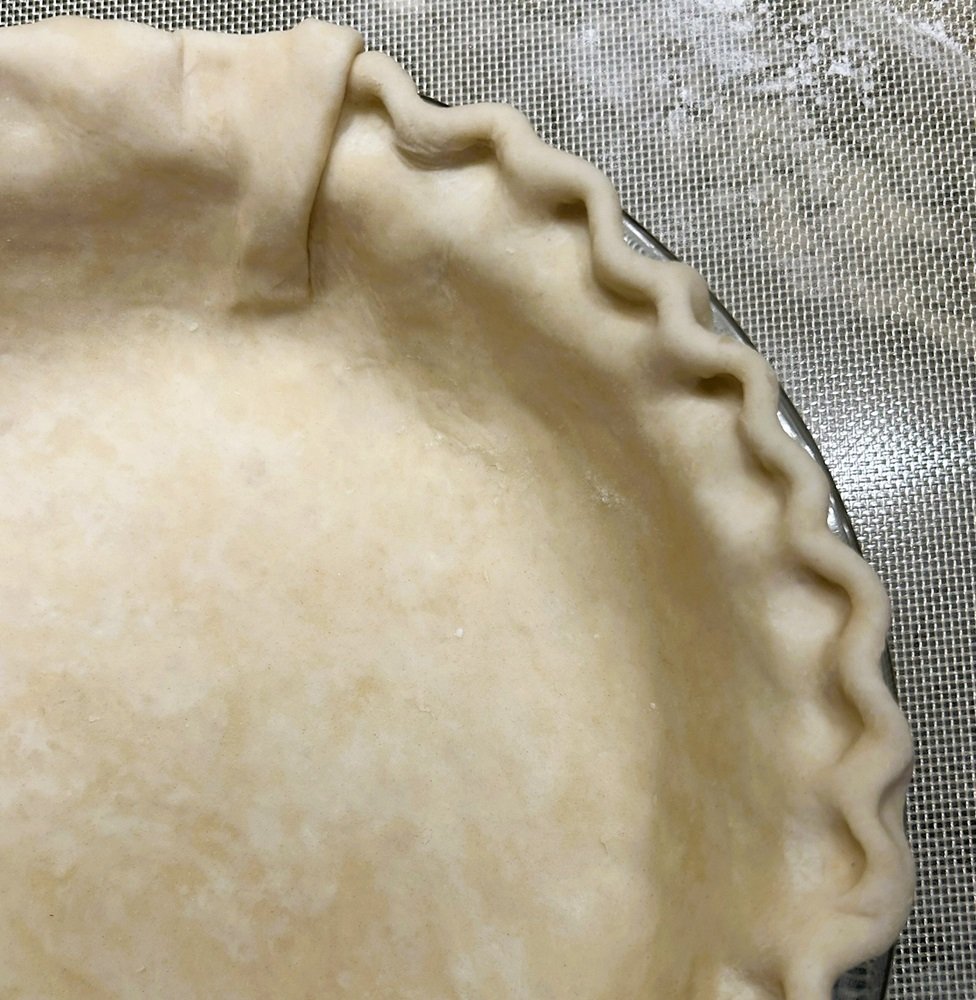
The Fluted Crimp
Place one hand on the inner edge of the pie crust and one on the outer edge. With the pie crust in between two index fingers, press towards each other at a slight offset. This will created a rounded, fluted edge. Continue around the circumference of the pie.

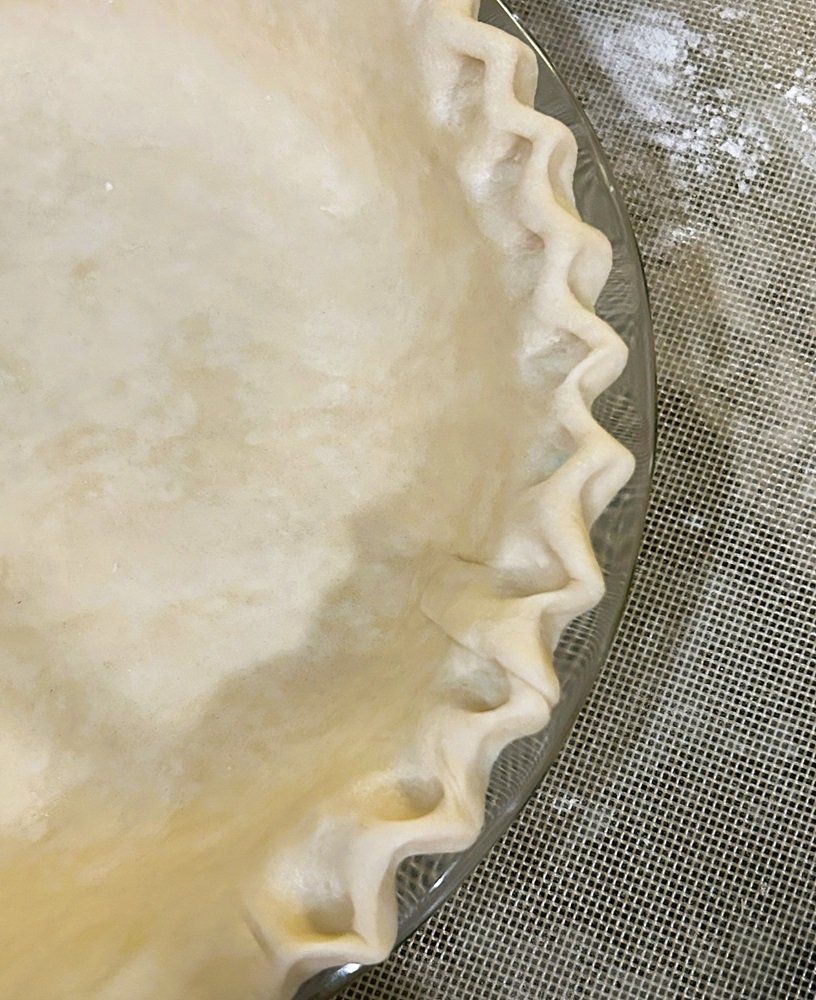
The V-crimp
This is my favorite crimping technique! The clean lines make my pie look so professional.
Situate one hand inside the pie edge and one hand outside. With your outer hand, pinch together the thumb and forefinger, creating a v-shape. With the index finger of your inner hand, press the dough outward into the area between the thumb and index finger of the outer hand.
This creates a clean, edgy zig-zag all around the outside of the pie crust.

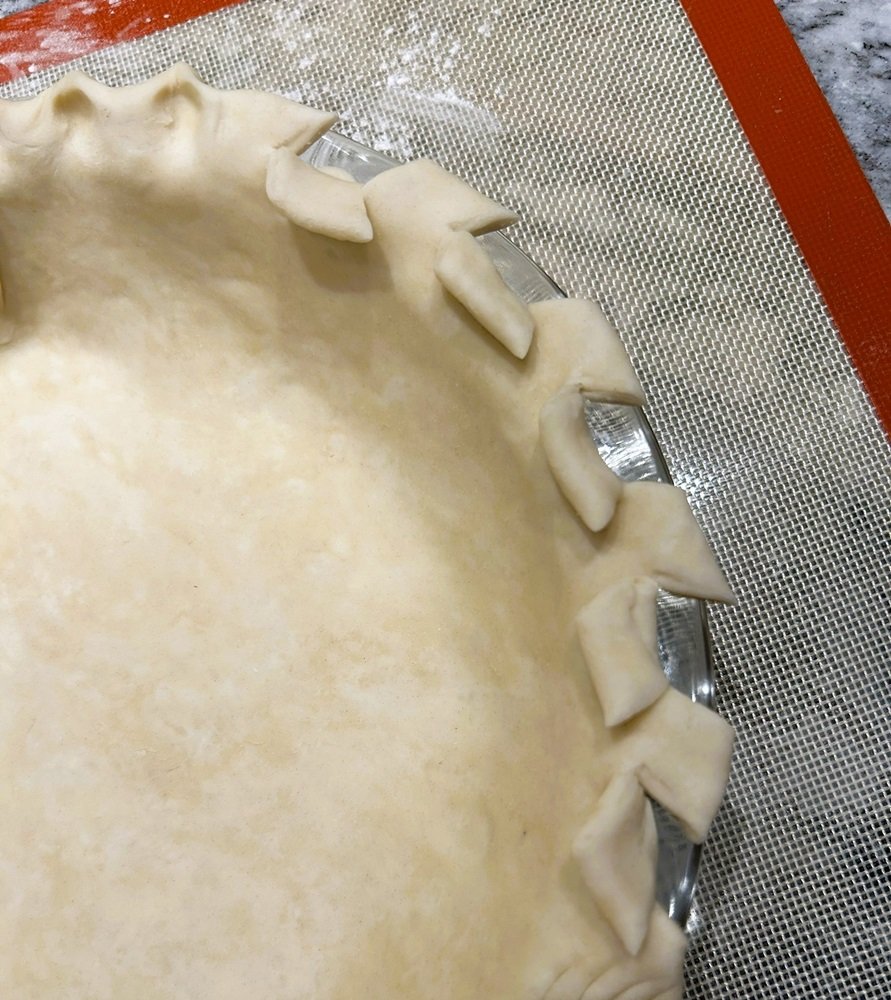
The Wheat Crimp
The wheat crimp technique is fancy yet rustic. It looks complicated but is actually really simple!
Use a pair of kitchen shears to snip into the pie edge at a diagonal. My cuts are about a 1/2 inch apart, but you can adjust the distance to create different effects. Continue around the entire edge.
Once all the cuts are complete, gently fold each “leaf” in opposite directions – alternating inward and outward. The result is a wheat-or vine-like effect around the entire pie crust.

Pie Crust Edging Expert Tips
- Cool hands, cool crust: If your fingers are too warm, dip them in a bowl of ice water and dry them before handling the dough. Warm fingers melt the butter in the dough, ruining your pretty edges.
- Use flour if needed: If the edge starts to soften while you’re working on it, dip your fingers in a little flour (but make sure to brush off any excess). This stops the dough from becoming too sticky.
- Chill out: If your dough becomes too soft to work with, cover it and pop it back in the fridge for 10–20 minutes. A chilled dough is much easier to handle and holds its shape better.
- Release the pressure: For those double-crust pies, remember to cut steam vents. Your filling creates steam near the end of the baking process. If there are no vents, this can pop open the edge seams of your pie.

The Best Pie Crust to Use
The key to pretty pie crust edges is using the right dough.
A classic butter pie crust gives you that beautiful, flaky texture we all love. Plus, it’s easy to work with when shaping those decorative edges.
If you’re short on time, store-bought pie dough works too—just make sure to let it thaw or soften at room temperature for easier handling.
Common Pie Crust Problems
Here are a few common pie crust issues and how to fix them:
- Shrinking dough: If your dough shrinks too much while baking, it likely wasn’t rested long enough. Next time, chill it in the fridge for a good 30 minutes before baking.
- Soggy bottom: To avoid this, use a glass or metal pie pan, and make sure to bake the pie on the lower rack of the oven. Blind baking (pre-baking the crust) also helps prevent sogginess.
- Burnt edges: Don’t let your beautiful pie edge burn to a crisp! The edges always cook faster than the rest of the pie, so use these pie crust shields to protect them.
And if your pie crust is especially unwieldy, it’s likely that you screwed up the measurements. Read my measuring tools post for help.
FAQs
Why do my pie crust edges fall flat?
This often happens if the dough isn’t chilled before baking.
Make sure to refrigerate your pie for about an hour before it goes into the oven.
Can I make pie crust ahead of time?
Yes! You can make pie dough up to a week in advance and keep it in the fridge.
You can also freeze it for up to 6 months. Some people swear by only cooking fruit pies from frozen—it stops the bases from becoming soggy!
